Working with Glazes

Glazing is a technique that can be used with all different paint mediums and has several advantages. For many painters the prospect of glazing is daunting, partly because it is built up to be the holy grail of painting – something elusive and difficult to comprehend. In actual fact glazing is easy and comes naturally to a painter once the basics have been grasped.
Glazing for Translucency
Glazing can be used to give opaque colours a translucent effect. Put simply, because of differences in pigment, some colours are, by nature, more opaque than others. This means that while blues, for example, tend to have a shimmering and glossy feel by nature, light reds and whites are very opaque and dry.Glazes can be used to produce a shimmering effect in an otherwise opaque colour. This is achieved through the thinning of the oil paint with linseed oil, or with a blend of linseed oil and turpentine (called ‘painters medium’), for acrylic, other mediums can be bought, for gouache and watercolour water can be used. The thinned paint (the thinner the better) is then applied to the surface of the painting and is allowed to dry, before another glaze is then added. By building up in this way the intensity of the colour found in the paint as it comes straight from the tube can then be achieved, but with a translucent effect. Alternatively, you may wish to apply only one or two layers, thus creating a very subtle evocation of your chosen colour.
Colour Combination Glazing
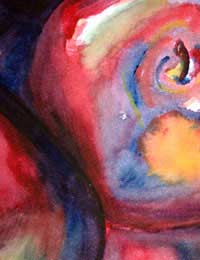
Glazing is also used to create different colours upon the painting’s surface. In much the same way that two primary colours make a secondary colour, and a primary plus a secondary make a tertiary colour when mixing on the palette (see related article), colours can be combined within a painting using glazes. To do this simply apply a glaze of one colour over another.You can create a variety of effects by applying over one main plane of colour, different coloured glazes in different areas. This can be seen to great effect in the glazes applied to flesh tones in the work of masters such as Rubens (1577-1640). Green is often applied to skin to give a figure a pallid look. Red is applied over a flesh tone to give the sensation of physical tension, and so on.
Glazes are also used as a matter of course by watercolour painters, due to the thinness of watercolour. The key here is to use the whiteness of the paper behind the glazes to evoke light, whilst incorporating different colours to show variants of that light as it appears in a given landscape – for example – to the eye.

Re: Contextualising Your Work
Dear Mr Watson, I have been working relentlessly for 40 years through Art, writing, performance based expressions in theatre, dance,…
Re: How to Sell My Paintings and Drawings?
Hi , I would like say about my cousin that he live in Afghanistan and he is fabulous in art painting and doing job…
Re: How to Sell My Paintings and Drawings?
Amy - Your Question:Hi I have just left school and I love to draw I do pencil work and I would love to sell my…
Re: How to Sell My Paintings and Drawings?
Hi I have just left school and I love to draw I do pencil work and I would love to sell my drawing but I don't no how…
Re: How to Sell My Paintings and Drawings?
Hi, I have 3 drawings the information as follows: 1- Salvador Dali (Spanish Draftsman). Is 24x19 cm. 2- Pablo…
Re: Freeing Yourself Up
I love drawing so much and I will like to be one of the best artist in the world
Re: How to Sell My Paintings and Drawings?
anna-81 - Your Question:Hi, I need help how can I sale my paintings and drawings and I want to know if my work is…
Re: How to Sell My Paintings and Drawings?
Hi, i need help how can i sale my paintings and drawings and i want to know if my work is really good or not. I'm…
Re: How to Sell My Paintings and Drawings?
i want to sell my drawing give me the idea.
Re: How to Sell My Paintings and Drawings?
I am 15 years old and i would like to sell my pencil drawing